Devops
Linux server administration, docker, AWS, nginx, apache, sql ...
- Accessing file systems for linux machines on the local network
- Cloudflare for local server
- Certbox & NGINX on AWS
- Debug Docker Errors
- Certbox & NGINX on AWS
- Install and Configure Memcached
- PHP-FPM Optimization
- Automatic AWS EC2 Backups
- Generally Useful Docker Commands
- Connect to Remote Servers with VSCode
- Create your own “cloud” storage with Syncthing
- Debug PHP with XDebug and VSCode (docker edition)
- SSH Access with Nautilus
- NameCheap SSL Certificates
- Using Cloudfront For CDN
- Connect to S3 from your local Ubuntu file system
- Protecting wp-admin from bots
- Skip Password Prompts for Sudo commands
- Fix Localhost Binding for Safari
- Create an SSH Key for Git
- Install Mkcert for SSL on Localhost
- Apache Tricks
- NodeJS Proxy via Apache
- SQL simplified
- Setup a WebSocket Server with Cloudflare
Accessing file systems for linux machines on the local network
Locate the other machines on your local network:
sudo arp-scan --localnet
result example:
Interface: wlp0s20f3, type: EN10MB, MAC: 04:33:c2:71:7e:42, IPv4: 192.168.0.106
Starting arp-scan 1.9.7 with 256 hosts (https://github.com/royhills/arp-scan)
192.168.0.1 cc:32:e5:54:10:13 TP-LINK TECHNOLOGIES CO.,LTD.
192.168.0.105 f0:f0:a4:15:28:59 (Unknown)
192.168.0.113 18:a6:f7:1d:98:59 TP-LINK TECHNOLOGIES CO.,LTD.
192.168.0.181 00:0e:08:eb:76:d5 Cisco-Linksys, LLC
192.168.0.157 c0:e7:bf:09:b8:bd (Unknown)
192.168.0.172 fc:b4:67:55:a5:24 (Unknown)
192.168.0.192 24:dc:c3:a1:80:f0 (Unknown)
192.168.0.175 ac:41:6a:26:cd:1f (Unknown)
192.168.0.173 e8:4c:4a:b4:cc:5c (Unknown)
192.168.0.184 4e:03:73:ea:b3:b8 (Unknown: locally administered)
192.168.0.186 5c:61:99:7a:64:5d (Unknown)
192.168.0.103 0c:9d:92:29:4a:a3 ASUSTek COMPUTER INC.
192.168.0.129 62:1e:f2:c4:cf:80 (Unknown: locally administered)
Hopefully these names will allow you to identify the machines. In my case the target machine was using a TP-Link wireless card so knowing the router is always 192.168.0.1, I was able to deduce that the target machine IP was 192.168.0.113
NOTE: in the example below I am using SSH so the host and target machine will both require SSH to be installed. Use these commands to install:
sudo apt-get install openssh-client
sudo apt-get install openssh-server
Now I am able to access the machine via SSH by using the command ssh <username>@192.168.0.113. Once connected I am prompted to enter the password for user <username>
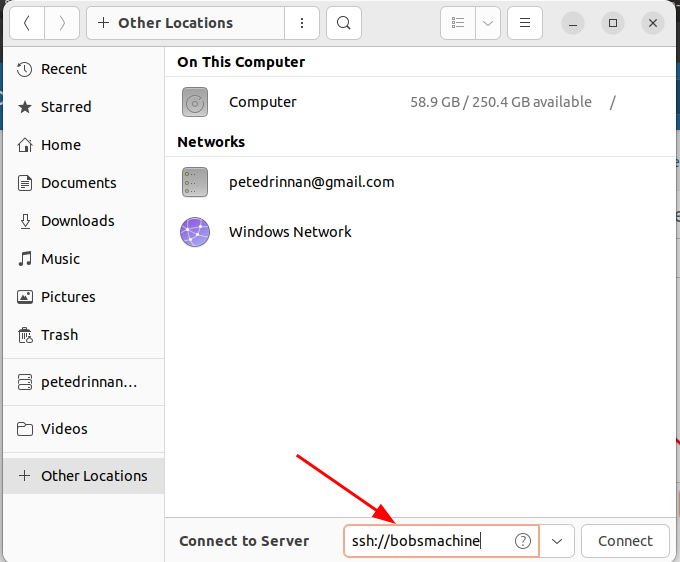
To explore the remote file system with Nautilus, I can open my local Nautilus window and under + Other Locations add ssh://<username>@192.168.0.113. Once open it will prompt me for the password for user <username>.

For a more permanent fix, you can add the host to your local ~/.ssh/config file as such:
Host bobsmachine
HostName 192.168.0.113
User bobsyetuncle
Now you can go into nautilus and under + Other Locations enter ssh://bobsmachine
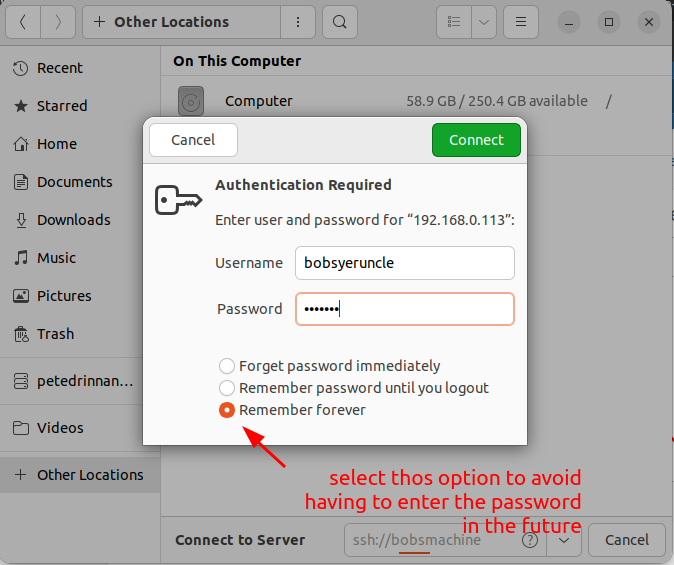
When prompted to enter the username and password, selecting the "Remember forever" option will allow you to login to the remote macine in the future without having the re-enter the password.
Cloudflare for local server
Use skiff for email. Copy DNS setting from skiff to cloudflare.
See: https://www.youtube.com/watch?v=hrwoKO7LMzk
https://raidowl.hostyboi.com/2022/08/22/Cloudflare-Tunnel/
install
wget -q https://github.com/cloudflare/cloudflared/releases/latest/download/cloudflared-linux-amd64.deb && dpkg -i cloudflared-linux-amd64.deb
run a local host server
cd ~/www/nodeserver/
node hello.js
CLOUDFLARE
https://cyberhost.uk/cloudflare-argo-tunnel/#adding-more-services
https://developers.cloudflare.com/cloudflare-one/connections/connect-networks/get-started/create-local-tunnel/
1.) login to cloudflare dashboard
2.) create a new domain name
3.) open terminal and login via cmd
cloudflared tunnel login
select the domain name. a new pem file will be saved to local
3.) create the tunnel:
cloudflared tunnel create mysite.com
if it exists delete it by checking with cloudflared tunnel list then cloudflared tunnel delete impressto.ca
a new credential json file will be saved to your local
4.) create the config file /home/webdev/.cloudflared/config.yml
url: http://localhost:5000
tunnel: 63f68dbe-585c-4c30-bdd9-980c39aa23e1
credentials-file: /home/annie/.cloudflared/63f68dbe-785c-4520-bdd9-980c39aa23e1.json
5.)
setup the dns:
cloudflared tunnel route dns mysite.com mysite.com
note you may need to delete the existing DNS CNAME record in the cloudflare website first
6.)
finally run it:
cloudflared tunnel run impressto.ca
change the local server address by editing ~/.cloudflared/config.yml
SERVING LOCAL SERVICES
sudo crontab -e
@reboot /home/annie/work/impressto/new_server/startup.sh
make sure to add local addresses to /etc/hosts otherwise they will not be available for the tunnel on local
Certbox & NGINX on AWS
Did you know you can use CertBot and NGINX to have a wildcard certificate? Here’s how to do it with an AWS Ubuntu sever.
Prerequisites:
- AWS Route 53 DNS hosted zone
- Web server using NGINX
- Website already configured using SSL
- SSH access with sudo (root) privileges
- Knowledge and comfort navigating linux using the bash shell
- Knowledge and comfort on how to view and edit files in linux (ie. vi, vim, nano…)
Overview:
The high level process to achieve our objective is as follows:
- Installing CertBot
- Installing DNS Plugin
- Create IAM Policy
- Create IAM Role
- Associate IAM Role with EC2 Instance
- Run CertBot and get new Certs
- Update NGINX to use new SSL Certs
- Test and restart NGINX
- Validate SSL Cert
- Test and review CertBot auto renewal
Disclaimer: As with any change, please make sure that you have created a Jira ticket, received proper approval, notified business partners, scheduled the action and taken the necessary actions to backup and recover should anything go wrong.
Installing CertBot:
SSH to the web server and run the following commands:
sudo apt-get update
sudo apt-get install software-properties-common
sudo add-apt-repository universe
sudo add-apt-repository ppa:certbot/certbot
sudo apt-get update
sudo apt-get install certbot python-certbot-nginx
Install DNS Plugin:
SSH to the web server and run the following command:
sudo apt-get install python3-certbot-dns-route53Create IAM Policy:
See also: https://certbot-dns-route53.readthedocs.io/en/stable/
Create new IAM policy using the AWS Route53 ZoneID of the hosted zone that you want to get an SSL Cert for.
{
    "Version": "2012-10-17",
    "Id": "certbot-dns-route53 sample policy",
    "Statement": [
        {
            "Effect": "Allow",
            "Action": [
                "route53:ListHostedZones",
                "route53:GetChange"
            ],
            "Resource": [
                "*"
            ]
        },
        {
            "Effect" : "Allow",
            "Action" : [
                "route53:ChangeResourceRecordSets"
            ],
            "Resource" : [
                "arn:aws:route53:::hostedzone/YOURHOSTEDZONEID"
            ]
        }
    ]
}
Create a new IAM Role:
- Click [Create Role] > [AWS Service] > [EC2] > [Next: Permissions]
- Search for and select your newly created Policy (one created from above)
- Click [Next: Tags] > (Enter a TAG if you wish) > [Next: Review]
- Give your new role a meaningful name and description
- Click [Create Role]
Associate Role with EC2 Instance:
- Click to select your EC2 Instance
- Click [Actions] > Instance settings > [Attach / Replace IAM Role]
- In the “IAM Role” dropdown list, click and select the IAM Role that you created (from above)
- Click [Apply] > [Close]
Run CertBot and get new Certs:
It’s important to get both the example.com and *.example.com as WILDCARD certs need to include the naked domain as well as any sub domains.
Note: Be sure to review/update example.com, *.example.com before running the below command.
sudo certbot certonly --dns-route53 -d example.com -d *.example.com --dns-route53-propagation-seconds 30 -m domains@mysite.com --agree-tosIf the above command runs successfully, it will populate the necessary certificate key files into the /etc/letsencrypt/live/example.com/ directory.
Update NGINX to use new SSL Certs:
The next step requires that you update the existing SSL configuration of the NGINX server to use the new LetsEncrypt certs. There are a few common locations to check:
- /etc/nginx/nginx.conf
- /etc/nginx/sites-available/<site name>
- /etc/nginx/snippets/
- Update the following folders with new “fullchain.pem and privkey.pem”
- beta_ssl.conf , fastcgi-php.conf , rc_ssl.conf , snakeoil.conf
Between these locations, you should be able to locate the SSL configuration/settings What your looking are the following two keys:
- ssl_certificate
- ssl_certificate_key
Below is a description of the newly downloaded LetsEncrypt keys
- `privkey.pem` : the private key for your certificate.
- `fullchain.pem`: the certificate file used in most server software.
- `chain.pem` : used for OCSP stapling in Nginx >=1.3.7.
- `cert.pem` : will break many server configurations, and should not be used without reading further documentation
You need to update the following SSL entries to point to the new LetsEncrypt keys
- ssl_certificate /etc/letsencrypt/live/
example.com/fullchain.pem; - ssl_certificate_key /etc/letsencrypt/live/
example.com/privkey.pem;
Test and restart NGINX:
Test that there are no errors in any of your NGINX files by running the following command
sudo nginx -tIf all of the tests come back as successful, you can go ahead and restart the nginx service
sudo service nginx restartValidate SSL Cert:
Once restarted, open a browser window and visit your site. You want validate that the website is using the new LetsEncrypt SSL cert and that the expiration is set 90 days out.
Debug Docker Errors
Seriously have you tried just rebooting your machine?
For general container logs you can use the standard docker logs command:
docker logs -f --until=120s laravelSSLCertificateFile: file ‘/config_items/certs/impressto.pem’ does not exist or is empty
If the folder ~/Sites/impressto-docker/config/certs exists but is empty you will need to run this terminal command:
cd ~/Sites/impressto-docker
./createSSLCert.sh
Ngserve is not Running
If you are unable to load the webapp on ngserve.impressto.localhost, it is likely caused by a missing dependency in the ~/Sites/impressto-webapp folder. Most likely it is a missing environment.local.ts file.
You can test ngserve by logging into the docker container with “impressto” and running the following:
cd /var/www/impressto-webapp;
ng serve ---configuration local --base-href /app/  --ssl true
Once you have fixed the issue you can run the “impressto” command again and wait a few minutes for ng-serve to rebuild the files.
Cannot create container from docker-compose due to short volume name
You may have forgotten to edit the file ~/Sites/impressto-docker/.env.example. Make changes as needed and save the file as .env. You can also run:
cd ~/Sites/impressto-docker;
./prepareDockerConfigs.sh;
Containers fail to load or shut down randomly on your machine but not others
If you see this happening it is likely RAM related. Either you are running out of memory of you have bad RAM.
First try importing a docker container. If the imported container works you likely do not have hardware issues. If you are still having crashed containers after importing a container image, you need t start testing your system hardware. A common symptom of bad RAM is random computer crashes and intermittent freezing interfaces. If you need to reboot your machine several times a day, your hardware is probably baked.
Try memtester in Ubuntu 20
sudo apt-get install memtester
sudo memtester 1024 5
Another option is GTK Stress Tester but that will not find memory faults.
Composer running out of memory
Composer defaults to a maximum of 1.5G of memory usage. Sometimes this is not enough for a composer update. If you notice that builds are not completing correctly for this reason, a work-around is the following command:
COMPOSER_MEMORY_LIMIT=-1 composer updateError: Cannot find module ‘nan’
This is more of an angular issue on mac but you may run into it while setting up your local webapp. Fix is to go into the ~/Sites/impressto-webpp folder and enter this command:
npm i -g nanCan’t connect to docker daemon. Is ‘docker -d’ running.
This error may also appear as:
ERROR: Couldn't connect to Docker daemon at http+docker://localhost - is it running?This error is most commonly seen if you have not added your user to the docker group. Rum the following commands:
sudo groupadd docker;

sudo usermod -aG docker $USER;
After that simply reboot your machine and the problem should go away.
create .: volume name is too short, names should be at least two alphanumeric characters
Did you remember to rename the docker root folderfile .env.example to env ?
Also this can happen if the formatting in the docker-compose.yml is not correct (bad indenting).
Cannot use port 80
If you have ngonx, apache or skype installed on the host system that will block the use of port 80. To determine what is running on port 80 use this command:
sudo lsof -i tcp:80This should display something like this
sudo lsof -i tcp:80

COMMAND  PID     USER   FD   TYPE DEVICE SIZE/OFF NODE NAME
nginx   1858     root    6u  IPv4   5043      0t0  TCP ruir.mxxx.com:http (LISTEN)
nginx   1867 www-data    6u  IPv4   5043      0t0  TCP ruir.mxxx.com:http (LISTEN)
nginx   1868 www-data    6u  IPv4   5043      0t0  TCP ruir.mxxx.com:http (LISTEN)
nginx   1869 www-data    6u  IPv4   5043      0t0  TCP ruir.mxxx.com:http (LISTEN)
nginx   1871 www-data    6u  IPv4   5043      0t0  TCP ruir.mxxx.com:http (LISTEN)
identify the PID of the process using port 80 and kill it using a command like this
sudo lsof -t -i tcp:80 -s tcp:listen | sudo xargs killYou can also permanently turn off apache on the host with:
sudo service apache2 stop;
sudo service mysql stop;

# also apache and mysqlfrom starting as a service on bootup
sudo systemctl disable apache2 mysql;
in some cases it is easiest to just completely remove apache2 from the host system
sudo apt-get --purge remove apache2;
sudo apt-get remove apache2-common;
NodeJS – FATAL ERROR: Ineffective mark-compacts near heap limit Allocation failed – JavaScript heap out of memory
This is not actually a docker error but may occur if you are runniing webpack builds inside docker (not recommended). If you are getting this error on our host system try the following command which is what we have used on the feature and builder servers:
 #increase node memory to 2gb
export NODE_OPTIONS=--max-old-space-size=2048
Performance issue with Mac:
Follow the official instructions for installing Docker on Mac. In a nutshell you will need to download Docker for Mac, and install it as you would any other Mac app. IMPORTANT: make sure you have the latest version of docker for Mac. Once installed you will need to allocate enough memory for docker to run the containers. Recommended size is 8GB. Not setting the memory limit may cause the elastic search container to exit with a 137 error code (docker container out of memory). Linux does not require this config as it allocates memory directly from the host system.
Certbox & NGINX on AWS
Did you know you can use CertBot and NGINX to have a wildcard certificate? Here’s how to do it with an AWS Ubuntu sever.
Prerequisites:
- AWS Route 53 DNS hosted zone
- Web server using NGINX
- Website already configured using SSL
- SSH access with sudo (root) privileges
- Knowledge and comfort navigating linux using the bash shell
- Knowledge and comfort on how to view and edit files in linux (ie. vi, vim, nano…)
Overview:
The high level process to achieve our objective is as follows:
- Installing CertBot
- Installing DNS Plugin
- Create IAM Policy
- Create IAM Role
- Associate IAM Role with EC2 Instance
- Run CertBot and get new Certs
- Update NGINX to use new SSL Certs
- Test and restart NGINX
- Validate SSL Cert
- Test and review CertBot auto renewal
Disclaimer: As with any change, please make sure that you have created a Jira ticket, received proper approval, notified business partners, scheduled the action and taken the necessary actions to backup and recover should anything go wrong.
Installing CertBot:
SSH to the web server and run the following commands:
sudo apt-get update
sudo apt-get install software-properties-common
sudo add-apt-repository universe
sudo add-apt-repository ppa:certbot/certbot
sudo apt-get update
sudo apt-get install certbot python-certbot-nginx
Install DNS Plugin:
SSH to the web server and run the following command:
sudo apt-get install python3-certbot-dns-route53Create IAM Policy:
See also: https://certbot-dns-route53.readthedocs.io/en/stable/
Create new IAM policy using the AWS Route53 ZoneID of the hosted zone that you want to get an SSL Cert for.
{
    "Version": "2012-10-17",
    "Id": "certbot-dns-route53 sample policy",
    "Statement": [
        {
            "Effect": "Allow",
            "Action": [
                "route53:ListHostedZones",
                "route53:GetChange"
            ],
            "Resource": [
                "*"
            ]
        },
        {
            "Effect" : "Allow",
            "Action" : [
                "route53:ChangeResourceRecordSets"
            ],
            "Resource" : [
                "arn:aws:route53:::hostedzone/YOURHOSTEDZONEID"
            ]
        }
    ]
}
Create a new IAM Role:
- Click [Create Role] > [AWS Service] > [EC2] > [Next: Permissions]
- Search for and select your newly created Policy (one created from above)
- Click [Next: Tags] > (Enter a TAG if you wish) > [Next: Review]
- Give your new role a meaningful name and description
- Click [Create Role]
Associate Role with EC2 Instance:
- Click to select your EC2 Instance
- Click [Actions] > Instance settings > [Attach / Replace IAM Role]
- In the “IAM Role” dropdown list, click and select the IAM Role that you created (from above)
- Click [Apply] > [Close]
Run CertBot and get new Certs:
It’s important to get both the example.com and *.example.com as WILDCARD certs need to include the naked domain as well as any sub domains.
Note: Be sure to review/update example.com, *.example.com before running the below command.
sudo certbot certonly --dns-route53 -d example.com -d *.example.com --dns-route53-propagation-seconds 30 -m domains@mysite.com --agree-tosIf the above command runs successfully, it will populate the necessary certificate key files into the /etc/letsencrypt/live/example.com/ directory.
Update NGINX to use new SSL Certs:
The next step requires that you update the existing SSL configuration of the NGINX server to use the new LetsEncrypt certs. There are a few common locations to check:
- /etc/nginx/nginx.conf
- /etc/nginx/sites-available/<site name>
- /etc/nginx/snippets/
- Update the following folders with new “fullchain.pem and privkey.pem”
- beta_ssl.conf , fastcgi-php.conf , rc_ssl.conf , snakeoil.conf
Between these locations, you should be able to locate the SSL configuration/settings What your looking are the following two keys:
- ssl_certificate
- ssl_certificate_key
Below is a description of the newly downloaded LetsEncrypt keys
- `privkey.pem` : the private key for your certificate.
- `fullchain.pem`: the certificate file used in most server software.
- `chain.pem` : used for OCSP stapling in Nginx >=1.3.7.
- `cert.pem` : will break many server configurations, and should not be used without reading further documentation
You need to update the following SSL entries to point to the new LetsEncrypt keys
- ssl_certificate /etc/letsencrypt/live/
example.com/fullchain.pem; - ssl_certificate_key /etc/letsencrypt/live/
example.com/privkey.pem;
Test and restart NGINX:
Test that there are no errors in any of your NGINX files by running the following command
sudo nginx -tIf all of the tests come back as successful, you can go ahead and restart the nginx service
sudo service nginx restartValidate SSL Cert:
Once restarted, open a browser window and visit your site. You want validate that the website is using the new LetsEncrypt SSL cert and that the expiration is set 90 days out. Individual browser instructions can be found in the link provided below, however what you’re looking for is something like this:


Instructions on how to view SSL certificate details in each browser can be found at https://www.globalsign.com/en/blog/how-to-view-ssl-certificate-details/
Test and review CertBot auto renewal:
The last thing to do before finishing up is making sure that both the automatic renewal process will work and that it’s scheduled.
To test the auto renewal process run the following on the web server:
sudo certbot renew --dry-runIf successful you can check to see if a scheduled task is set to automatically run the renew process. By default, Certbot tries to renew the cert once every 12 hours. The command to renew certbot will be installed in one of the following locations:
- /etc/crontab/
- /etc/cron.*/* – (ie. /etc/cron.d/certbot)
- systemctl list-timers
To check the status of the certbot including the auto renew cron job run the following command:
sudo tail -50 /var/log/letsencrypt/letsencrypt.logMore information:
Install and Configure Memcached
Memcached is a lightweight alternative to Redis for storing short lived cache which would otherwise we written to the local storage folder as files.
Installing Memcached on Linux is fast and easy. Follow these steps (5 minute job):
1.) As a user with root privileges, enter the following command:
sudo apt-get update;
sudo apt-get install memcached libmemcached-tools php-memcached;
2.) Once the installation is completed, the Memcached service will start automatically. To check the status of the service, enter the following command:
sudo systemctl status memcached3.) Change the memcached configuration setting for CACHESIZE and -l:
Open /etc/memcached.conf in a text editor.
Locate the -m parameter and change its value to at least 2048 (2GB)
# memory
-m 2048
Locate the -l parameter and confirm its value is set to 127.0.0.1 or localhost
4.) Save your changes to memcached.conf and exit the text editor then restart memcached.
#restart memcached
sudo systemctl restart memcached

#confirm it is running
echo "stats settings" | nc localhost 11211

# check number of cached items
echo "stats items" | nc localhost 11211
5.) Note that on some systems memcached may not automatically start on bootup. In that case use this command to fix:
sudo systemctl enable memcached6.) Add the php memchached extension
sudo apt-get install php7.3-memcached;Configure Laravel to Use Memcached
Laravel is wired to use memcached out-of-the-box. To enable memcached you simply have to add this line to the .env file:
CACHE_DRIVER=memcachedIf you need to edit the ports used by memcaches, you can find those setting in config/cache.php.
PHP-FPM Optimization
Out-of-box php fpm is configured for very low server specs such as a 2 core machine. It needs to be configured to match the hardware you are on. You need to factor on the most expensive processes you run.
Typically a low-end production server has 4 cores with 8 GB RAM so you can use the following configuration:
Edit the file /etc/apache2/mods-enabled/mpm-event.conf and add the following:
# event MPM
# StartServers: initial number of server processes to start
# MinSpareThreads: minimum number of worker threads which are kept spare
# MaxSpareThreads: maximum number of worker threads which are kept spare
# ThreadsPerChild: constant number of worker threads in each server process
# MaxRequestWorkers: maximum number of worker threads
# MaxConnectionsPerChild: maximum number of requests a server process serves
# <IfModule mpm_event_module>
# 	StartServers			 2
# 	MinSpareThreads		 25
# 	MaxSpareThreads		 75
# 	ThreadLimit			 64
# 	ThreadsPerChild		 25
# 	MaxRequestWorkers	  150
# 	MaxConnectionsPerChild   0
# </IfModule>


#  ServerLimit           (Total RAM - Memory used for Linux, DB, etc.) / process size
#  StartServers          (Number of Cores)
#  MaxRequestWorkers     (Total RAM - Memory used for Linux, DB, etc.) / process size

<IfModule mpm_event_module>
        # for c5 classes with only 8GB ram
        # ServerLimit              500
        StartServers             4
        MinSpareThreads          25
        MaxSpareThreads          75
        ThreadLimit              64
        ThreadsPerChild          25
        MaxRequestWorkers        2800
        # for c5 classes with only 8GB ram
        # MaxRequestWorkers       1400
        MaxConnectionsPerChild   1000
</IfModule>
Edit the file /etc/php/7.4/fpm/pool.d/www.conf and make sure the following setting are there:
; settings explanation - don't need to copy this
;pm.max_children         (total RAM - (DB etc) / process size)
;pm.start_servers        (cpu cores * 4)
;pm.min_spare_servers    (cpu cores * 2)
;pm.max_spare_servers    (cpu cores * 4)


; default is dynamic but that can churn up the memory because it leave processes lingering
; pm = dynamic
pm = ondemand
; default is pm.max_children = 5
pm.max_children = 256

; everything below is only relevant if using pm = dynamic
; for c class servers with only 8GB ram
; pm.max_children = 128
; default is pm.start_servers = 2
pm.start_servers = 16
; default is pm.min_spare_servers = 1
pm.min_spare_servers = 8
; default is pm.max_spare_servers = 3
pm.max_spare_servers = 16
; setting to 0 or leaving commented out will use the PHP_FCGI_MAX_REQUESTS value whatever that is.
pm.max_requests = 1000
Now we have allowed php to run a lot more threads we may run into a “too many open files” error.
To fix edit /etc/php/7.4/fpm/php-fpm.conf and change the rlimit_files to 4096. If you are still getting the “too many open files” error you can double this.
rlimit_files = 10000You can also try editing /etc/security/limits.conf and adding the following:
*              hard    nofile      10000
*              soft    nofile      10000
www-data       soft    nofile  10000
www-data       hard    nofile  10000
Restart everything:
sudo service apache2 restart && sudo service php7.4-fpm restartAutomatic AWS EC2 Backups
If you have a lot of developers working on the same server, there is nothing worse than having to fix something that went horribly wrong with it. That is why I wrote a script (see at bottom of this page) to help other developers to back up their AWS EC2 instances daily and set the number of versions to keep. If a developer screws up the server, that is ok. You can just restore a copy from last night.
First thing you will need to do is create an AWS IAM user to allow you to specify a backup policy. This user will be restricted to very limited abilities. Once the user has been created apply a policy that just allows backups. I suggest AWSBackupFullAccess . Please avoid using full access policies. They can allow someone to do crazy dangerous things (like spinning up multizone servers $$$ outch).
Once you have created a user with the required backup policy, create an Access Key. You will use the generated Access Key and Secret in the script below.
Now you can SSH into your EC2 instance (Ubuntu in my case) and install the AWS cli tool.
sudo apt-get -y install awscli; aws configure;Fill in the appropriate values for the configuration prompts. Remember to use the Key and Secret you just created. You can see an example of what values the config tool expects in the script code below. Make sure you know the region as the backup will only work if the region matched the EC2 instances you are backing up.
Next you need to get the id of the EC2 insance or instances you want to backup. In the examples script below it is only backing up one server but you can do many. Example below.
instances+=("autobackup_developmemt|i-0ed78a1f3583e1543")
instances+=("autobackup_staging|i-0ed72a1f3583e343")
Once that is done you are ready to add the script to your server. It will run off a cron. Make sure you put the file someplace this is not accessible to the public obviously (e.g. not in a public website folder).
Make the script executable using the chmod +x command. Then give it a test.
Once you know it runs as you can see the AMI (EC2 backup image) created or being created, you can add a cron to automate the backups. Use this command to create or edit the crontab. Note that for ubuntu the typical user is “ubuntu” but for AWS Linux it will be “ec2-user”.
sudo crontab -e -u ubuntuAdd the following line (adjust the path to your script)
# backup EC2 instances nightly 4:30 am GMT
30 4 * * * . $HOME/.profile;  /var/devops/ec2_backup.sh
Now are are done. You can sleep at night knowing that no matter how much someone screws up the server, they won’t screw up your day.
Here the full script:
#!/bin/bash

# prior to using this script you will need to install the aws cli on the local machine

# https://docs.aws.amazon.com/AmazonS3/latest/dev/setup-aws-cli.html

# AWS CLI - will need to configure this
# sudo apt-get -y install awscli
# example of current config - july 10, 2020
#aws configure
#aws configure set key ARIAW5YUMJT7PO2N7L *fake - user your own*
#aws configure secret X2If+xa/rFITQVMrgdQVpFLx1c7fwP604QkH/x *fake - user your own*
#aws configure set region us-east-2
#aws configure set format json


# backup EC2 instances nightly 4:30 am GMT
# 30 4 * * * . $HOME/.profile;  /var/www/devopstools/shell-scripts/file_backup_scripts/ec2_backup.sh

script_dir="$(dirname "$0")"

# If you want live notifications about backups, use this example with a correct slack key
#SLACK_API_URL="https://hooks.slack.com/services/T6VQ93KM/BT8REK5/hFYEDUCoO1Bw72wxxFSj7oY"


prevday1=$(date --date="2 days ago" +%Y-%m-%d)
prevday2=$(date --date="3 days ago" +%Y-%m-%d)
today=$(date +"%Y-%m-%d")

instances=()
# add as many instances to backup as needed
instances+=("autobackup_impressto|i-0ed78a1f3583e1543")


for ((i = 0; i < ${#instances[@]}; i++)); do

    instance=${instances[$i]}

    instanceName="$(cut -d'|' -f1 <<<"$instance")"
    instanceId="$(cut -d'|' -f2 <<<"$instance")"

    prevImageName1="${instanceName}_${prevday1}_$instanceId"
    prevImageName2="${instanceName}_${prevday2}_$instanceId"
    newImageName="${instanceName}_${today}_$instanceId"

    consoleout --green "Begin backing $instanceName [$instanceId]"

    aws ec2 create-image \
        --instance-id $instanceId \
        --name "$newImageName" \
        --description "$instanceName" \
        --no-reboot

    if [ $? -eq 0 ]; then
        echo "$newImageName created."
        echo ""
        if [ ! -z "${SLACK_API_URL}" ]; then
            curl -X POST -H 'Content-type: application/json' --data '{"text":":rotating_light: Backing up *'$newImageName'* to AMI. :rotating_light:"}' ${SLACK_API_URL}        fi
        echo -e "\e[92mBacking up ${newImageName} to AMI."
    else
        echo "$newImageName not created."
        echo ""
    fi

    imageId=$(aws ec2 describe-images --filters "Name=name,Values=${prevImageName1}" --query 'Images[*].[ImageId]' --output text)

    if [ ! -z "${imageId}" ]; then

        echo "Deregistering ${prevImageName1} [${imageId}]"
        echo ""
        echo "aws ec2 deregister-image --image-id ${imageId}"
        aws ec2 deregister-image --image-id ${imageId}
    fi

    imageId=$(aws ec2 describe-images --filters "Name=name,Values=${prevImageName2}" --query 'Images[*].[ImageId]' --output text)

    if [ ! -z "${imageId}" ]; then

        echo "Deregistering ${prevImageName2} [${imageId}]"
        echo ""
        echo "aws ec2 deregister-image --image-id ${imageId}"
        aws ec2 deregister-image --image-id ${imagesId}
    fi

    consoleout --green "Completed backing $instanceName"

done
Generally Useful Docker Commands
Remove all Docker Containers
Stop the container(s):
cd ~/mydocker-repo-folder;
docker-compose down;
Delete all containers :
docker rm -f $(docker ps -a -q)Delete all volumes:
docker volume rm $(docker volume ls -q)Delete all networks:
docker network rm $(docker network ls -q)Kill a specific container :
docker container kill [CONTAINER_NAME]Saving and Restoring Docker Containers
In cases where you cannot for whatever reason build docker containers on your local system, do not fear. Docker allows you to save and import backed up images of containers.
Saving Containers
It is a good habit to routinely save containers. Just open a terminal and use the docker save command. Example here:
docker save -o ~/Desktop/my_docker_image.tar laravelOnce that is saved you can share it with other developers or keep it as a personal backup. You can also share it with another developer directly using JustBeamIt.
Restoring from a Container Image
If one of your containers is acting wonky, you can get the name and image id with the following command:
docker images
You can see the image name and id in the list.

If the container is running, you can shut it all down with “docker-compose down”. Then you can delete the offending container with the docker rm command. Here is an example:
# kill docker compose
cd ~/my-docker-folder;
docker-compose down;

docker image rm 3f8c96702c14
Now you can load a new container to replace the broken one. To do this you will need to get an image from another developer or use one you previously saved.
To load the container from the image use the docker load command. Example here:
docker load -i ~/Desktop/my_docker_image.tarRunning multiple services in one container
In my case I want to serve some pages with php and others with nodejs within the same container. This saves a lot of build time and memory. So here is what I add to my Dockerfile
CMD /config_items/run.shThen in the file run.sh I start php, nginx and run a nodejs app all in different threads using a single ampersand to run each command in a differrent thread. This lets me run as many processes as needed concurrently.
service php8.0-fpm start & nginx -g 'daemon off;' & cd /var/www/pslamp-blog && npm run start
In cases where you cannot for whatever reason build docker containers on your local system, do not fear. Docker allows you to save and import backed up images of containers.
Saving Containers
It is a good habit to routinely save containers. Just open a terminal and use the docker save command. Example here:
docker save -o ~/Desktop/my_docker_image.tar laravelOnce that is saved you can share it with other developers or keep it as a personal backup.
Restoring from a Container Image
If one of your containers is acting wonky, you can get the name and image id with the following command:
docker images
docker image rm IDOFBADCONTAINER
Now you can load a new container to replace the broken one. To do this you will need to get an image from another developer or use one you previously saved.
To load the container from the image use the docker load command. Example here:
docker load -i ~/Desktop/my_docker_image.tarConnect to Remote Servers with VSCode
By far one of the coolest VSCode extensios I’ve used in a whole. This saves me so much time when debugging dev /build machines. I also use Nautilus on Linux to browser remote servers but being able to edit code like it is local saved a heck of a lot of time.
Add the remote SSH VSCode extension: https://marketplace.visualstudio.com/items?itemName=ms-vscode-remote.remote-ssh
ext install ms-vscode-remote.remote-sshNo add an ssh entry on your local ~/.ssh/config file.
Example entry:
Host impressto
HostName 154.343.23.44
User ubuntu
IdentityFile ~/work/keys/mysite.pem
Open a terminal and test to make sure you can SSH in. You can just use for the example config above:
ssh impresstoIn VSCode use Ctrl+Shift+P then enter ssh. Select the first option Remote-SSH:Connect to Host.
Create your own “cloud” storage with Syncthing
I have been using Syncing for years now and had assumed eveyone had at least heard of it. Apparently not. When I do mention it people seem to think is is an impossible thing. It isn’t and it is really easy to setup.
What the heck is Syncthing?
It is an open source (fully) privatem decentralized file system that uses torrent technology to share files between multipe machines/devices. There is no “middleman” to cut the connection so running Syncthing between your own devices really is your own private cloud. It comes with a great GUI and is very easy to use.
Why Syncthing?
Traditional cloud storage is cleap enough that the cost is not prohibitive for most people, at present. In my case most of my backups are for files I won’t look at for years – maybe even decades. A LOT can change in a decade when it comes to online services. Anyone who ever used Panoramio can tell you about the milions of user-uploaded pictures Google simply decided to delete. Point is backups for personal docs, pictures, etc are YOURS and nobody else should be able to decide on how or if they will be stored.
Syncthing allow you to use multiple devices to provide redundancy. If a hard drive on one device fails, you still have copies on other devices. It is also a lot faster than using a cloud service because typically you are only transferring files locally on the same network, although you can share files with any device anywhere in the work if you want to.
Setting up Syncthing on Ubuntu
sudo apt install curl apt-transport-https;

curl -s https://syncthing.net/release-key.txt | sudo apt-key add -;

echo "deb https://apt.syncthing.net/ syncthing release" | sudo tee /etc/apt/sources.list.d/syncthing.list;

sudo apt-get update;

sudo apt-get install syncthing;

# replace username with your own system username
sudo systemctl enable syncthing@username.service;

# replace username with your own system username
sudo systemctl start syncthing@username.service;
Once you have completed the commands above you can open the syncthing GUI in your browser with http://127.0.0.1:8384
Debug PHP with XDebug and VSCode (docker edition)
If you are using Docker you will want to add this to your Dockerfile (runs when container being created).
RUN pecl install -f xdebug-2.9.8 \
&& rm -rf /tmp/pear \
&& echo "zend_extension=$(find /usr/local/lib/php/extensions/ -name xdebug.so)" > /usr/local/etc/php/conf.d/xdebug.ini;
Xdebug configuration
You can tweak the Xdebug configuration on file docker-compose.yml:
The laravel container definition has an environment variable for this purpose
- XDEBUG_CONFIG=remote_host=mysite.docker.laravel remote_port=9000 remote_enable=1 remote_autostart=1 default_enable=1 idekey=VSCODE remote_connect_back=1Adjust it, in particular the idekey should match the key set in your IDE.
VSCode setup
On VS Code we can use the PHP Debug plugin, once installed we can go to the Debug panel (Ctrl+Shift+D).
- Select Add configuration in the the dropdown at the top-right of the panel.
- In VSCode open the menu Run/Add Configuration, it opens launch.json. launch.json
SSH Access with Nautilus
If using Linux with Nautilus you can connect directly to the server.
1.) create a config file in .ssh directory.
sudo gedit ~/.ssh/configPaste the following and save. You may need to edit the path to your pem files.
Host myserver
HostName 18.216.138.59
User ubuntu
IdentityFile ~/keys/myserver.pem
Now you can connect using terminal with this example:
ssh myserveron command line will connect to your remote amazon ec2 server without anyother info.
Open Nautilus. press Ctrl+L
there you can type ssh://myserver
press enter.
Note you can also just trasnfer files directly with this example:
scp -i ~/keys/myserver.pem file.txt ubuntu@18.216.138.59:/var/www/mysqldump/.NameCheap SSL Certificates
Namecheap is as the name suggests; a cheap place to get stuff. Their SSL certificates cost 1/5 of what they cost at Godaddy and are pretty much just as good. There are some odd bugs with the namecheap site. Below are the steps you need to successfully create and deploy an SSL certificate from NameCheap.
1.) Creare a csr file
openssl req -new -newkey rsa:2048 -nodes -keyout mysite.key -out mysite.csr2.) Go to https://ap.www.namecheap.com/
3.) Upload csr file to namecheap site. This will let you get a validation file.
4.) add the validation file to the root website folder: /.well-known/pki-validation/
This automatcially validates with: http://mysite.com/.well-known/pki-validation/AEF34B001667BF75FD31F090F99754C0.txt
If it fails to validate contact support and they can force it.
5.) At this point you should be ready to add the generated SSL certificate the the server. Download the package.
6.) Add the dowloaded files to your /etc/apache/ssl folder.
7.) Add the config file to your vhost file. It should look something like this:
<VirtualHost *:80>
    ServerName stuff.mysite.com
    DocumentRoot /var/www/stuff/public
</VirtualHost>

<VirtualHost *:443>
    ServerName stuff.mysite.com
    DocumentRoot var/www/stuff/public
	<Directory var/www/stuff/public>
            Options FollowSymLinks
            AllowOverride All
            DirectoryIndex index.php
     </Directory>

	Include /etc/apache2/ssl/mysite_2021/namecheap-ssl-apache.conf

</VirtualHost>
8.) Restart the server with sudo service apache2 restart and you should be good.
Using Cloudfront For CDN
Basic Setup
To setup a CDN using Cloudfront you first need to create an S3 bucket and make it public. In this example we will use pslampdemo.s3.amazonaws.com
Note that when setting up a cloudfront distribution you will need to assign an SSL certificate. See: https://impressto.net/aws-setup-ssl-certificates
Once your public S3 bucket has been created to to the Cloudfront console and create a new distribution. Go to https://console.aws.amazon.com/cloudfront/home?region=us-east-2#create-distribution
- Select one of the S3 buckets we are using for the CDN.
- For the origin path we will leave it empty so we can use the root folder of the S3 bucket.
- Select the HTTP > HTTPS redirect as a precatution to prevent accidental use of assets on HTTP
- For alternative domain names add the domain name we will be using for the CDN. This will be added to route53 as a CNAME record.
- Select the ssl certificate (this is one we upload ourselves)
- Click the Create Distribution button. It takes several minutes for a distribution to generate but that is ok as we have work to do now with route53.
- Click on the new distribution to get the url . You can not look for the new domain name for the distribution. It will look something like: dr8thfc1fd2g.cloudfront.net
- copy the domain and head over to Route53 – https://console.aws.amazon.com/route53/home?region=us-east-2
- Add the CNAME record linking pdlampdemo.com to the cloudfront distribution domain (e.g. dr8thfc1fd2g.cloudfront.net)
- That’s it.
Select one of the S3 buckets we are using for the CDN. For the origin path we will leave it empty so we can use the root folder of the S3 bucket. Set a HTTP > HTTPS redirect as a precatution to prevent accidental use of assets on HTTP.
For alternative domain names add the domain name we will be using for the CDN. This will be added to route53 as a CNAME record. Select the ssl certificate (this is one we uploaded ourselves earlier).
Click on the new distribution to get the url . You can not look for the new domain name for the distribution. It will look something like: dr8thfc1fd2g.cloudfront.net.
Copy the domain and head over to Route53 – https://console.aws.amazon.com/route53/home?region=us-east-2#resource-record-sets:Z34JVZ4MBJ5FQW
Add the CNAME record linking pslampdemo.com to the cloudfront distribution domain (e.g. dr8thfc1fd2g.cloudfront.net). After saving that you will be able to access the S3 assets with the CDN domain.
Enabling CORS for CDN
You will needed to enable CORS for the s3 bucket. Navigate to the S3 bucket on AWS and click the Cors Configuration button.
Add the following XML and save
<?xml version="1.0" encoding="UTF-8"?>
<CORSConfiguration xmlns="http://s3.amazonaws.com/doc/2006-03-01/">
<CORSRule>
    <AllowedOrigin>*</AllowedOrigin>
    <AllowedMethod>GET</AllowedMethod>
</CORSRule>
</CORSConfiguration>
Enable Header Whitelisting in the Cloudfront Distribution
To forward the headers from your CloudFront distribution, follow these steps:
- Open your distribution from the CloudFront console.
- Choose the Behaviors tab.
- Choose Create Behavior, or choose an existing behavior, and then choose Edit.
- For Cache Based on Selected Request Headers, choose Whitelist.
- Under Whitelist Headers, choose headers from the menu on the left, and then choose Add.
- Access-Control-Request-Headers
- Access-Control-Request-Method
- Origin
Enable GZip Compression
By default gzip compression is off. To turn it on you will need to edit the behavoir setting for the Cloudfront distribution.
- Select the distribution and click the “Distribution Settings” button
- Select the “Behaviors” tab then click the “Edit” button
- Set the cache policy to “Managed-CacheOptimization”
Enabling Gzip Compresson
Open the cloudfront page then select the distribution.
Click the behavoir tag.
Select the behavior and click Edit
Set the Cache Policy to Managed-CachingOptimized and turn on Compress Object Automatically.
Invalidating Cloudfront Files
To clear the files from cache (ssl update of emergency fixes after a deployment) follow these steps:
- Go to the cloudfront distribution page, select the distribution page.
- Select the distribution for which you want to invalidate files.
- Choose Distribution Settings.
- Choose the Invalidations tab.
- Choose Create Invalidation.
- For the files that you want to invalidate, enter one invalidation path per line. For information about specifying invalidation paths, see Specifying the Files to Invalidate.
- Important
Specify file paths carefully. You can’t cancel an invalidation request after you start it. - Choose Invalidate.
How S3 paths become CDN paths
This s3 path
now works as:
https://dr8thfc1fd2g.cloudfront.net/website/images/broadcast-marketplace.png
which in turn with a cname record in route53 becomes:
Additional info:
Using CDN for WordPress
We use the wp-offload plugin to host wordpress media files on S3. This allows us to upload images to a standard folder which is then accesible via CDN.
Make sure to read the instruction and set your CDN url accordingly.
Connect to S3 from your local Ubuntu file system
For Mac and Linux you can connect to s3 buckets from your local file navigator using s3fs
https://cloud.netapp.com/blog/amazon-s3-as-a-file-system
Here are the commands you need for Ubuntu. Replace BUCKETNAME with the name of your S3 bucket.
cd ~/;

# for Debian (Ubuntu)
sudo apt-get install s3fs;

# for mac use  Brew install s3fs

echo ACCESS_KEY:SECRET_KEY > ~/.passwd-s3fs;
# confirm entry was added
cat ~/.passwd-s3fs;
chmod 600 .passwd-s3fs;
mkdir ~/BUCKETNAME-s3-drive;
s3fs BUCKETNAME ~/BUCKETNAME-s3-drive;Protecting wp-admin from bots
The most common attack on a wordpress site it the login page. Weak or compromised passwords are used by automated bots that will hit thousands of sites a day trying multiple username/password combinations.
In this article I will show you how to use .htaccess with nginx on Unbunt (or any Debian system) to prevent bots from accessing your WordPress login url.
First of all install apache2-utils:
sudo apt-get update -y;
sudo apt-get install -y apache2-utils;
Create a .htpassed file
sudo htpasswd -c /var/www/.htpasswd mysiteadminusernameamajiggerEdit your /etc/nginx/sites-available/vhost file to add:
	location /wp-login.php {
    	    auth_basic       "Administrators Area";
	    auth_basic_user_file /var/www/.htpasswd;
	}

	location /wp-admin {
    	    auth_basic       "Administrators Area";
	    auth_basic_user_file /var/www/.htpasswd;
	}
Full example of my own file :
server {

    root /var/www/impressto.net;
    index index.php index.html index.nginx-debian.html;
    server_name impressto.net www.impressto.net;

    location / {
        root /var/www/impressto.net;
        if (!-e $request_filename) {
            rewrite ^/(.*)$ /index.php?q=$1 last;
        }
    }

    location ~ \.php$ {
        include snippets/fastcgi-php.conf;
        fastcgi_pass unix:/run/php/php7.4-fpm.sock;
    }

    location /wp-login.php {
        auth_basic       "Administrators Area";
        auth_basic_user_file /var/www/.htpasswd;
    }

    location /wp-admin {
        auth_basic       "Administrators Area";
        auth_basic_user_file /var/www/.htpasswd;
    }

}
Now test your config:
sudo nginx -t;If no errors shown restart nginx
sudo systemctl restart nginx;Now it you go to your wp-admin url you will get a blocking password prompy. This will block most automated bots.
Skip Password Prompts for Sudo commands
When administrating a development machine or server you may find yourself needlessly entering sudo password. On a production machine this is something you’d want but for a local or develpment machine not so much.
Here’s how you can bypass the password:
Open the /etc/sudoers file (as root, of course!) by running:
sudo visudoNote you should never edit /etc/sudoers with a regular text editor, such as Vim or nano, because they do not validate the syntax like the visudo editor.
At the end of the /etc/sudoers file add this line replacing username with your actual username:
username ALL=(ALL) NOPASSWD:ALLSave the file and exit with <ESC>wq. If you have any sort of syntax problem, visudo will warn you and you can abort the change or open the file for editing again.It is important to add this line at the end of the file, so that the other permissions do not override this directive, since they are processed in order.
Note that for mac the save steps are a little different because mac uses vim for visudo edits. Press the Escape key. Then, type :wq and press enter. This saves the file and quits vim.
Finally, open a new terminal window and run a command that requires root privileges, such as sudo apt-get update. You should not be prompted for your password!
Fix Localhost Binding for Safari
Safari does not automatically bind *.localhost domains to 127.0.0.1. To use Safari for local development and especially when using docker with SSL you will need to add the entries to your /etc/hosts file. Here is an example:
sudo nano /etc/hosts# add the following entries
127.0.0.1 mysite.localhost
127.0.0.1 somesubdomain.mysite.localhost
Create an SSH Key for Git
SSH keys are not just for Git but if you want to use SSH cloning for git, yeah you need em.
To create a new SSH key pair do the following:
1.) Open a terminal on Linux or macOS, or Git Bash / WSL on Windows.
2.) Generate a new ED25519 SSH key pair:
ssh-keygen -t rsa -b 2048 -C "username@mysite.com"
or ssh-keygen -t ed25519 -C "username@mysite.com"
3.) Use the defaults for all options if you like. Doesn’t matter.
Copying SSH Key to Gitlab
Go into the ~/.ssh folder. On Mac you may need to do the following to see the .ssh folder:
# open the finder dialog
Command+Shift+G
# enter ~/.ssh

# view hidden files
Command+Shift+.
On Linux:
cd ~/.ssh

# on your keyboard hit Ctrl +h
Once you can see the hidden files you should see a file named id_rsa.pub or something like that. It ends with .pub. Open that file with a text editor and you will see the SSH key you need to copy to your own gitlab account.
Using a Access Token (works too but yuk!)
If you are not using an SSH connection you may need to create a personal access token (image below). Make sure you save the token on your local machine as you will not be able to retreive it once you close the page where you created it on Gitlab.
To clone a repo using an access token, it is similar to cloning with https but the url is slightly different. If your token is for example xSx81KqnADs-mZ4JviHa, the cloning command will be
git clone https://oauth2:xSx81KqnADs-mZ4JviHa@gitlab.com/myaccount/myrep.gitIf you were previously using https with a username and password, you will need to update the remote url on your local machine. Once you have created the access token you will need to change the remote origin of your local repo to add the access token. Here is an example of the old remote url and a new one
# old url
https://somegitsite.com/mycompany/mysite.git

# new url with access token
https://oauth2:uggU-s2usayJtiqguEAQ@somegitsite.com/mycompany/mysite.git
To set the remote url use the following command as an example:
git remote set-url origin https://oauth2:AmDAyXHEVxyEBf3fbg@somegitsite.com/mycompany/mysite.gitInstall Mkcert for SSL on Localhost
Mkcert is a simple tool for generating locally-trusted development SSL/TLS certificates. It requires minimal configuration.
https://github.com/FiloSottile/mkcert
Prerequisites (Ubuntu / Debian)
Make sure you have:
-
libnss3-toolsinstalled -
Homebrew (Linuxbrew) if you want to install via brew
To install on Debian (Ubuntu) use the following commands:
sudo apt install libnss3-toolsInstall LinuxBrew – get the installer
/bin/bash -c "$(curl -fsSL https://raw.githubusercontent.com/Homebrew/install/master/install.sh)"Enable it
test -d ~/.linuxbrew && eval $(~/.linuxbrew/bin/brew shellenv)
test -d /home/linuxbrew/.linuxbrew && eval $(/home/linuxbrew/.linuxbrew/bin/brew shellenv)
test -r ~/.bash_profile && echo "eval \$($(brew --prefix)/bin/brew shellenv)" >>~/.bash_profile
echo "eval \$($(brew --prefix)/bin/brew shellenv)" >>~/.profile
Install mkcert
brew install mkcert;
mkcert -install;
If at this point you are getting a mkcert command not found , or Warning: /home/linuxbrew/.linuxbrew/bin is not in your PATH. you many need to fix the global PATH var to include the mkcert bin folder. Edit your ~/$HOME/.profile file and add the following :
if [ -d "/home/linuxbrew/.linuxbrew/bin" ] ; then
    PATH="/home/linuxbrew/.linuxbrew/bin:$PATH"
fi
Save the .profile file and from the terminal run source ~/.profile
An alternative way to install Mkcert is the following (not fully tested by me):
sudo apt-get update
sudo apt install wget libnss3-tools
set MCVER="v.1.4.1"
wget -O mkcert https://github.com/FiloSottile/mkcert/releases/download/${MCVER}/mkcert-${MCVER}-linux-amd64
chmod +x mkcert
sudo mv mkcert /user/local/bin
Why This Matters
Using mkcert lets you emulate HTTPS in your local environment, which helps with catching mixed content issues, testing secure cookies, HSTS, etc., before you deploy to production.
Apache Tricks
Set Server Agent Name
sudo apt-get install libapache2-mod-security2Once the module is installed, you can modify the Apache config under the file /etc/apache2/apache2.conf. Add this line around the end of the file.
<IfModule mod_security2.c>
SecServerSignature "ecoware"
</IfModule>
How to set the Expires Headers in Apache
enable expires and headers modules for Apache
sudo a2enmod expires;
sudo a2enmod headers;
Edit the /etc/apache2/apache2.conf file
sudo nano /etc/apache2/apache2.confAdd the following
<IfModule mod_expires.c>
ExpiresActive on
AddType image/x-icon .ico
ExpiresDefault "access plus 2 hours"
ExpiresByType text/html "access plus 7 days"
ExpiresByType image/gif "access plus 7 days"
ExpiresByType image/jpg "access plus 7 days"
ExpiresByType image/jpeg "access plus 7 days"
ExpiresByType image/png "access plus 7 days"
ExpiresByType text/js "access plus 2 hours"
ExpiresByType text/javascript "access plus 2 hours"
ExpiresByType text/plain "access plus 2 hours"
ExpiresByType image/x-icon "access plus 30 days"
ExpiresByType image/ico "access plus 30 days"
</IfModule>
Restart apache
sudo service apache2 restartCheck that it worked by loading an image. You should see an expired line in the output such as
Expires: Wed, 22 Aug 2020 22:03:35 GMTSee: https://hooshmand.net/fix-set-expires-headers-apache/
NodeJS Proxy via Apache
Here is how to serve nodejs entry points by using an Apache proxy. This hides the port number and the nodeJs entry points simply appear as part of the “monolithic” application.
WINDOWS:
Setup is easy:
Include "conf/extra/httpd-proxy.conf"
LoadModule proxy_module modules/mod_proxy.so
LoadModule proxy_connect_module modules/mod_proxy_connect.so
LoadModule proxy_http_module modules/mod_proxy_http.so
2.) Open your proxy config file C:\xampp\apache\conf\extra\httpd-proxy.conf. Edit it to match the following:
<IfModule proxy_module>
     <IfModule proxy_http_module>
         ProxyRequests On
         ProxyVia On

      <Proxy *>
          Order deny,allow
          Allow from all
       </Proxy>

       ProxyPass /node http://127.0.0.1:3000/
       ProxyPassReverse /node http://127.0.0.1:3000/
   </IfModule>
</IfModule>
3.) Open your vhosts file C:\xampp\apache\conf\extra\httpd-vhosts.conf. Add the following:
 <VirtualHost *:*>
   ProxyPreserveHost On
   ProxyPass "/node" "http://127.0.0.1:3000/"
   ProxyPassReverse "/node" "http://127.0.0.1:3000/"
   ServerName api.impressto.net
</VirtualHost>
4.) Restart Apache.
from command terminal run:
sudo a2enmod proxy
sudo a2enmod proxy_http
sudo a2enmod proxy_balancer
sudo a2enmod lbmethod_byrequest
sudo service apache2 restart
2.) Open vhosts file /etc/apache2/sites-available/api.impressto.net.conf. Add the following:
<VirtualHost *:443>
  ServerAdmin admin@impressto.net
  ServerName impressto.localhost
  DocumentRoot /var/www/impressto.localhost/public

  ProxyPreserveHost On
  ProxyPass / http://127.0.0.1:8000/
  ProxyPassReverse / http://127.0.0.1:8000/

  ErrorLog ${APACHE_LOG_DIR}/error.log
  CustomLog ${APACHE_LOG_DIR}/access.log combined
  SSLEngine on
  SSLCertificateFile /etc/apache2/ssl/apache.crt
  SSLCertificateKeyFile /etc/apache2/ssl/apache.key

  <Directory /var/www/impressto.localhost/public>
  Options Indexes FollowSymLinks MultiViews
  AllowOverride All
  Require all granted
  </Directory>

</VirtualHost>
..
SQL simplified
Setup a WebSocket Server with Cloudflare
1. What WebRTC is
WebRTC (Web Real-Time Communication) is a set of APIs built into modern browsers that lets two peers (e.g., two users in React apps) connect directly to each other to exchange:
The magic: it works peer-to-peer, not through a central server (though servers are still used to help them connect).
2. The Core Pieces
For two apps to talk over WebRTC, you need:
a) Signaling
b) ICE / STUN / TURN
c) PeerConnection
d) Data Channel
3. Flow of a Connection
Here’s what happens when User A chats with User B:
4. Chat Example (DataChannel)
On Peer B:
5. File Transfer Example
WebRTC DataChannels support binary blobs, so you can send files chunk-by-chunk:
Receiver just listens for binary data and reconstructs the file.
6. Why This Is Cool
👉 So in your React app, the “chat + file transfer” works because:
1. What signaling needs
Signaling is just about exchanging:
This requires bidirectional, asynchronous communication between peers (via your server).
2. Options compared
✅ WebSockets
⚠️ HTTP (long polling / REST)
3. Hybrid approach
Some apps start with HTTP POST to register a peer (like “here’s my offer”) and then switch to WebSocket or another channel for ongoing exchange. But for your React chat/file transfer app, that’s overkill — just stick with WebSockets.
4. Rule of thumb
👉 So for your use case (chat + file sharing between React apps), WebSockets are definitely the better choice for signaling.
Would you like me to show you a minimal WebSocket + WebRTC signaling server (Node.js) that you could plug into your React app as a starting point?
1. Why you can use PHP
2. Options for PHP WebSocket servers
3. Minimal Ratchet Example
Install via Composer:
Server (server.php):
Run it:
4. Connecting from React
In your React app:
5. Is PHP the best choice?
1. Does Cloudflare support WebSockets?
✅ Yes.
2. How Cloudflare Tunnel affects it
So yes, your PHP WebSocket server will work fine through Cloudflare Tunnel.
3. Things to watch out for
4. Example Setup
✅ Result:
1. Prerequisites
2. Create a named tunnel
This generates a tunnel UUID and credentials file, usually at:
3. Configure the tunnel (YAML)
Create a config file at ~/.cloudflared/config.yml:
Explanation:
4. Connect the tunnel to Cloudflare
Run:
This tells Cloudflare DNS to point signal.example.com → your tunnel.
5. Run the tunnel
Foreground (debugging):
Background (production):
6. React client connection
Now in your React app, connect securely:
7. Important notes
👉 With this setup, you get:
Done — I created a code + instructions document in the canvas titled Webrtc-php-ratchet-signaling-and-react. It includes:
Open the canvas (the document named Webrtc-php-ratchet-signaling-and-react) to copy the server and client code and follow the run instructions.
1. Do you need special Nginx config?
It depends how you’re exposing your WebSocket server:
2. Does the PHP Ratchet server need to be persistent?
Yes ✅
That means:
Example systemd unit (/etc/systemd/system/ratchet.service):
Then:
3. Summary
🔑 Why Node.js fits better than PHP Ratchet for signaling
🟢 Minimal Node.js WebSocket signaling server
🔄 React client-side example
🚀 Deployment with Cloudflare Tunnel
✅ So in your case:
🔧 Options if port 8080 is already taken
✅ Recommended
If this signaling server is dedicated, Option 1 (different port + Cloudflare Tunnel mapping) is the cleanest and least error-prone. You don’t even need to touch your existing app or Nginx config.
1. Example setup
2. Cloudflare Tunnel config file (/etc/cloudflared/config.yml)
🔑 Notes:
http://is for normal HTTP traffic.
ws://is for raw WebSockets (Node signaling server).
http_status:404ensures unmatched requests don’t hang.
3. Start the tunnel
If your tunnel is already created:
If not, create one first:
4. DNS setup in Cloudflare
5. Verify
👉 This way you don’t worry about port clashes at all — every local service can run on its own port, and Cloudflare maps them to different hostnames.
1. Create the systemd unit file
Create a new file:
Paste this:
🔑 Replace
my-tunnel-idwith the name or UUID of your tunnel (you can see it incloudflared tunnel list).
You might also need to change/usr/bin/cloudflaredif it’s installed elsewhere (which cloudflaredwill tell you).
2. Create a dedicated user (optional, but safer)
3. Enable and start
4. Check status & logs
5. Verify it’s working
✅ With this, your tunnel will:
1. Create the service file
Save as:
Example unit:
2. Adjust paths and user
3. Enable and start
4. Check logs
5. Auto-restart on crash
The Restart=always + RestartSec=5s ensures that if your Node app crashes, systemd will bring it back up in 5 seconds.
✅ At this point:
🔧 Target Setup
1. PHP-FPM + Nginx config (API + frontend)
Example Nginx site config (e.g. /etc/nginx/sites-available/example.conf):
Here:
React build served on localhost:3000
PHP-FPM API served on localhost:8080
2. Node.js signaling server
Say you have /var/www/signaling/server.js:
Runs on localhost:9000.
3. Cloudflare Tunnel config (/etc/cloudflared/config.yml)
4. Services managed by systemd
Cloudflared
/etc/systemd/system/cloudflared.service
Node signaling server
/etc/systemd/system/signaling.service
5. Enable & start everything
6. Result
✅ With this, you have an all-in-one blueprint: PHP + Nginx + Node + Cloudflare Tunnel living together.
You never need to expose raw ports — just map each subdomain to the right service in your config.yml.
🟢 Enhanced Node.js Signaling + Messaging Server
🟡 React Client Example
Connecting & joining
Sending chat
File transfer (chunked)
Receiving chat / files
🔑 Key Points
✅ This way your Node server is: